Student Survey (end of) Quarter Three [21 points]

Please title your post: Quarter Three Student Survey


This assignment is due by the end of the block

Please complete the following survey questions. Please provide complete thoughts/answers; your input is very valuable to the continued success (and improvement) of this class.

PLEASE answer all seven questions using complete thoughts and proper grammar to receive full points for the assignment. Thank you very much for your input.


  1. What do you think is the most important thing that you have learned so far in this class?
  2. What (or which project) did you find the most difficult to complete and or understand?
  3. What did you like most about the course?
  4. What would you most like to see changed?
  5. How would you describe your skill level when you first entered the class? ex. Below Basic, Intermediate, advanced and how much (if at all) do you feel that your skill set has improved?
  6. Do you have any other comments about the module?

#1 Let’s Get Started!

Please title your post: My First Blog Post


Learning Targets:

Students will be able to:

  • create their own personal blog site
  • customize their blogs
  • navigate the blog
  • become familiar with the various menus
  • write and publish their first blog post

Students will create their own blog page through: www.edublogs.org

Choose the “Sign up for a Free Blog” option then proceed to the following steps:

  1. Username= In all lowercase letters enter the first letter of your first name followed by your last name i.e. dlafata
  2. Password= your ESD password
  3. Which best describes you?= student
  4. E-Mail= your ESD E-Mail
  5. Site Title= Your Block/Your Class/Your first name capitalized/Your last name capitalized* you do not need to add the underscore to your site title; I placed it in this example to show that there should be a space there.

Site Title Example: A1 VE Bobby Drake


Students will log into their blog and complete their first blog post. Please give it the title My First Blog Post.  Please use COMPLETE THOUGHTS and SENTENCES to answer the following in a blog post:

  1. How much experience have you had filming videos?
  2. What is your experience with video editing thus far?
  3. What specific things would you like to learn this semester regarding filming videos and video editing?
  4. What are your future career goals, and how can this class help achieve those goals?


Performance of Understanding:

  • My First Blog Post

#2 Formal Email Assignment

This assignment is due by the end of the period 1/29/24

Students will send a mock email (to Mr. LaFata) to ensure that our future correspondence is efficient and effective.

When emailing your teacher you must:

  1. Use the subject line with a general description of what your email pertains to, your last name, and class period ex: LaFata Block 3 Video Editing– grade “Formal Email Assignment”
  2. Include a greeting (ex. Good morning, Mr. LaFata)
  3. The body of your message, your question, etc. Do not use text language. You are not texting a friend, so please keep your language and tone professional.
  4. Be Specific! Make sure you include the name of the assignment you are emailing about and exactly what you would like done
  5. Closing message (ex. Thank you for your time. YOUR NAME)

Sample email:

  1. Subject Line:
  • Smith A1 Video Editing– grade “formal email assignment”

2. Greeting:

  • Hello, Mr. LaFata,
  • Good morning, Mr. LaFata

3-4. Be Specific:

  • Please grade my formal email assignment!

5.  Closing:

  • Have a nice day,
  • Thank You,

Jill Smith

#3 Video 101 Shooter’s Guide Chapters 3 and 4

This assignment is due by the end of class:

1/31/24

Please title your post: Video 101 Chapter 3&4 Study Guide 


Video 101 Shooter’s Guide 

Students, your assignment for this class period is to read and comprehend chapters 3 and 4 of the textbook: Video 101, and to complete the accompanying study guides. These chapters will provide you with the fundamental  concepts and basic techniques of video journalism, including: shot types, sequences and composition. You will find the readings as well as the study guides linked to this post.

Please complete the following steps before you begin working on your study guides! 

  1. Download copies of all three study guides
  2. Open your ESD Google Drive
  3. Create a new folder and name it: Video Editing
  4. Upload all three study guides into your Video Editing folder
  5. click on your video editing folder and select “Share”
  6. Change the restrictions to: “Anyone with the link”
  7. Copy the link
  8. Insert the link into your blog post using the “insert link” function
  9. Once you have your link inserted into your blog post, publish the post

Now you are ready to begin completing the study guides which will automatically save your progress, provided that you opened the document from your ESD Google Drive. You no longer have to worry about saving, the Google document will automatically update and save for you, cool right? Complete all questions on all three study guides and you are finished!


You may reference your study guides for your video productions, as well as any chapter tests that may follow.

Video 101 Chapter 3 pdf

https://eriesd-my.sharepoint.com/:b:/g/personal/dlafata_eriesd_org/EQ8cJMC04SxJh8FbGOl34H4BkvCMCuHHUVOetwJKPHJ6vg?e=WiIB0B

Video 101 Chapter 4 pdf

https://eriesd-my.sharepoint.com/:b:/g/personal/dlafata_eriesd_org/ETO-U6DvtqFIqxC2tQrK0LEBbNbfa-Zhk8Q9GvHZxdhOww?e=O5dKn8

Study Guides

Video Editing Study Guide Chapter 3

https://eriesd-my.sharepoint.com/:w:/g/personal/dlafata_eriesd_org/Efb9L2xr-otOvVcKoAxZZXUBWloGR1wn6xUAghBB-O-3DQ

Video Editing Study Guide Chapter 4 part I

https://eriesd-my.sharepoint.com/:w:/g/personal/dlafata_eriesd_org/EV4mNiBKnIdOlb9F73PksZ0BY-KfRUlhrBZUb0s5LrEgYg?e=wiagWW

Video Editing Study Guide Chapter 4 Part II

https://eriesd-my.sharepoint.com/:w:/g/personal/dlafata_eriesd_org/ERCxOsc_fOZEtnBPV70af8QBFnvz7bP94k4xAzP9QAX0fQ?e=3RK0Sf


#5 {20 Question Classmate Interview} [20 Points]

The due date for this assignment’s presentation is:

ADAY: 2/5/24

BDAY: 2/6/24

Please title your post: Classmate Interview


Learning target: interview a classmate


Your assignment is to interview and be interviewed by a classmate.

You must ask them 20 questions in total.

I have provided 12 example questions that you may use, but you will have to come up with the other nine questions yourselves.

You will then introduce your classmate and vice-versa to the whole class.

You will have ten minutes+ to interview your partner and them you. Make sure you take notes (just like a reporter).

You will then present the information to the class. Your grade will comprise of the thoroughness of the interview and professionalism of presentation.

Interviews should include (but are not limited to) and in no particular order other than name first:


Post the questions and answers (full sentences where applicable) on your blog page with the title: Classmate Interview

Please make the font color black for the questions and blue for the answers.

***Once you have added the interview questions to the body section of your post, select them, and deselect the number function so that the numbers disappear (just like you did for your first blog post).

  1. Full name
  2. Grade in school
  3. What was done over the summer break
  4. Why is the person taking broadcast journalism
  5. Family (parents, siblings, pets)
  6. Favorite subject in school
  7. Plans for the future
  8. Favorite music
  9. Favorite books
  10. Extracurricular activities or jobs
  11. Hobbies
  12. Something surprising that your classmates do not know

#6 Video Coach Volume #1: Chapter 1 Quizzes

This assignment is due at the end of the period:

ADAY 2/13

BDAY 2/12

Please title your post: Video Coach Volume #1: Chapter #1 Quizzes

Please navigate to the website: https://asbclassroom.com/students

Enter the password: focus

Please watch the Video Coach: Video Basics videos 1-5

Take the quiz at the end of each video

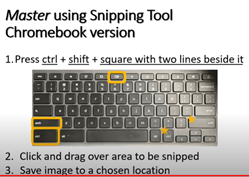
Use the Microsoft snipping tool to capture your results from each quiz. This can be found by selecting the windows icon and scrolling down to the windows accessories folder. **You may drag the snipping tool icon to the toolbar on your desktop for quick access.

If using a Chromebook, hold down the control and shift keys then select the switch windows key, this will allow you to capture a portion of your desktop


Post a snippet of your results on your blog page using the title: “Video Coach Volume #1: Chapter #1 Quizzes”

Please submit all 5 quiz result images on one blog post 

*****Make sure you zoom in on the image and make it large enough for me to read it. I must be able to read the word “passed” to award you credit for this assignment; FYI: You can enlarge the image by holding down the control key and selecting the “+” key, or by using the scroll wheel on your mouse.

Example post:

Video Coach Volume #1: Chapter #1 Quizzes

Chapter 1

Chapter 2

etc.


Getting Started with WeVideo

All Broadcast Journalism students must use the attached link to register for their WeVideo account.

  • WeVideo is an online video editing platform that we will be using for our upcoming video assignments/projects.
  • Please register ASAP. Email me if you have any problem registering.
  • Registering using this link will automatically enroll you into my 2022 S1 Video Editing classes if you log in through Google.
  • If applicable: Once you have created your account, select the “classroom” option and enter the code for your class.

B4 Broadcast Journalism: 

https://www.wevideo.com/invite?code=1a54a505-b32b-4074-9f2e-977bc6232ff8

CLASS CODE: 4dvq077


Once you have registered for your account, please watch the following tutorial, and begin to familiarize yourself with the WeVideo software. I would like you to take ample time to explore the software’s capabilities; I have found the WeVideo platform to be very user friendly and hopefully you will too. Please make sure you preview some of the stock footage that comes with the program. There is an impressive variety of clips that you may incorporate into your video projects. Once you have completed the tutorial, please move on to the next post. As always, email me if you have any questions or issues.

https://www.youtube.com/watch?v=qeTE1kGnTas&feature=youtu.be&utm_source=hs_automation&utm_medium=email&utm_content=85213933&_hsenc=p2ANqtz-8-BzkBSmOSUJfOCqlqTcIBfex8y5wRH8u1tDPOaFl8GW6MpjFxjPgHOVHfiMH5dSDyS2kVmUiZM4ZmHcos9qyhRxkZng&_hsmi=85213933

#7 Shooting a Sequence

This project is due by the end of class: 2/22/2024.


Learning Target:

Shoot, and edit two sequence videos.

There are separate assignments for each sequence video. They are found under  “assignments”  in the WeVideo Classroom.


Field Assignment: Shooting a Sequence
For: Individual Students
Equipment: One camera/smartphone, one tripod (if available)

  • Each student will shoot (2) two sequences. Each sequence will be shot in totally different locations: Wide-Medium-Tight.
  • Use a tripod or stabilize your smartphone.
  • Move around, don’t just zoom in. “Pick up sticks” (MOVE the tripod/camera).
  • Look for interesting shots—shots with depth, angles, unique lighting.
  • Hold the shots for at least seven or eight seconds.
  • Shoot a wide, medium and tight shot for both sequences.
  • DO NOT MOVE THE CAMERA WHILE FILMING! Set up and shoot, no panning, zooming, tilting etc.
  • All videos must always be filmed in landscape mode. Filming in portrait mode will result in an automatic zero.
  • All videos must always be edited on a pc or laptop using WeVideo. You may never edit videos on your phone.
  • Do not use transitions or special effects of any kind.

Sequence #1

will be shot using a person (not moving) and will include three shots: Wide, Medium and Tight. Please refer to your study guides is you can not remember how to frame a wide, medium, and tight shot.


sequence #2

must have a moving object in each of the three shots, and must include a cutaway shot. The movement needs to be significant, someone typing, texting on their phone, getting a drink from the drinking fountain does not qualify as significant. The subject should move through the frame.


Both completed videos must include:

  • A title slide with your block number, and your videos’ titles i.e. “A1  Sequence #1”  and “A1 Sequence #2”
  • you do not need to add a credit slide, but you may add an audio track to your sequences if you like.

Sequence Assignment Grading:

Please see the Sequence 1&2 project rubric found under “rubrics” at the top of the home blog page.


Your completed videos must be edited in WeVideo, and must include a title slide listing: your name, block number, and your video’s title e.g. “ John Rambo B2  Sequence 1” and “ John Rambo B2 Sequence 2.”

WeVideo:

Once you have uploaded your video clips to your Google Drive, log on to a PC or laptop computer to edit and produce your videos. DO NOT EDIT VIDEOS DIRECTLY ON YOUR PHONE.

  1. You will need to  upload your sequence clips to your Google drive. If you haven’t already, get the Google drive app from wherever you get your apps (Play store for Android phones  or iPhone App Store for iPhones).
  2. Make sure that you are signed in to your school Google account, and save your clips to your Google Drive. It’s a good idea to create a folder in your Google drive with your class name.
  3. Once the clips are saved to your Google drive, open the WeVideo  classroom on your Chromebook or PC and select your class.
  4. Select “assignments” and choose “Sequences.”
  5. You will then choose the “Add Media” option, and select “Google Drive.” There you should find  and import each of your sequence clips into your media library.
  6. Now you are ready to begin editing your sequence 1&2 videos!

Exemplars:

Sequence #1: 10 pts.

https://eriesd-my.sharepoint.com/:v:/g/personal/dlafata_eriesd_org/EfyRR9uomm9IsYqgPGBXavUBIww4INad38_4HhSMm5gfWA?e=alc6Pf


Sequence #2: 15 pts.

https://eriesd-my.sharepoint.com/:v:/g/personal/dlafata_eriesd_org/EZEDHK760DFJohXi8-FSHiIBM_rUSUDIov2-jrhCKdDhgw?e=Zyf8oB

https://eriesd-my.sharepoint.com/:v:/g/personal/dlafata_eriesd_org/ERyxpZe_5GJAuRVMJdXjUxMBHPhattFPhUQEm5NYrQPi8A?e=8DSgoY

https://eriesd-my.sharepoint.com/:v:/g/personal/dlafatABpJ2RdCseppz3JUJQgB4bgl50gW83p9kwf6IP8wkQ?e=2wIQm9a_eriesd_org/EVF-

#9 Scavenger Hunt

The due date for this assignment is due: 3/8/24

Team leaders should turn in the Scavenger Hunt Video project in the WeVideo classroom.


Learning Target:

Students will effectively use all necessary equipment and skill sets to put together a short video. The scavenger hunt script includes a variety of unique shots to practice shot composition.

Script: scavenger hunt script 


The Scavenger Hunt video will be graded using the General Video Project Rubric

Total Possible Points: 30

Examples of Student Videos:

https://eriesd-my.sharepoint.com/:v:/g/personal/dlafata_eriesd_org/EeyiYEen2HZBuaLP0SCla3EBLHBnGhKGcMSzMw1_U6Hc_Q?e=M0Kl3V

https://eriesd-my.sharepoint.com/:v:/g/personal/dlafata_eriesd_org/EeQvj_-POGhPppvSo9sf5xEB2bk9GFm6W2W8MhPcFYoYxA?e=zXnQo2

#10 How to Create a Storyboard

What Is a Storyboard?

A storyboard is a tool for sketching out how a video will unfold, shot by shot. It looks like a comic strip.

Each square represents a single shot. It shows who or what is in the scene, what’s being said, and any text or graphics that appear on the screen. As you read through a storyboard, you should be able to “see” the video playing in your head.

Why Create a Storyboard?

A good storyboard serves two main functions: planning and communication.

Planning

When you storyboard a video, you’re creating a plan for production. It’s tempting to just pick up a video camera and start recording, but without a road map you’ll waste time, money and energy.

A storyboard forces you to visualize the shots you’ll need, the order in which they’ll appear, and how the visuals will interact with the script. It’s much easier to hash out the details during pre-production than it is on location, when the clock is ticking on an expensive production team (or worse, after everything’s been shot!).

Communication

Another challenge of team productions like video is communication. With a storyboard, you can show a client or production crew exactly what you have in mind. No more wordy explanations or charades!

The storyboard will change as team members offer feedback and the project evolves. It’s an essential tool for making sure everyone involved is on the same page.

Shots and Cuts

After cameras and lenses, every video storyteller has two essential tools: shots and cuts. These two tools are much, much more important than the gear you use.

A shot is a clip of video. It has a beginning and an end, but beyond that it can be any duration of time (so long as it is unbroken) and contain anything you like. Shot choice is the fundamental expressive tool of video storytelling, and there are many different kinds of shots you can make. Choosing your shots carefully will likely give you the ability to manipulate your audience’s thoughts and feelings.

A cut is the end of a shot. Cuts are your essential narrative tool. The way a shot ends, and then how the next one starts is the main way that video tells a story. Good cuts create continuity and cohesiveness, and keep the audience engaged with the story. You decide when to make a cut twice: once when you are recording your original video clip, and again in post-production when you trim down and edit your clips together.

Making good shots and cuts is harder than it sounds! It’s especially hard to do them well without a plan.

How to Make a Storyboard

A storyboard doesn’t have to be an elaborate work of art. Here’s how to make one:

Step 1: Use the Storyboard Template found on the home blog page under, “Storyboard.”

Step 2:  Add the Script

Under each rectangle, write the line of script or dialogue that corresponds to that scene.

Step 3:  Sketch out the story:

Don’t worry if you’re not an artist – simple stick figures will do the trick. You can indicate movement with an arrow. A bad drawing is better than no drawing!

If you don’t want to sketch the shots by hand, you can use photographs or images cut from a magazine. There are even storyboarding tools online where you can select characters and settings, add speech bubbles and text blocks, and even record audio. Be warned, though – they’re tons of fun, and you can waste a lot of time!

Step 4:  Add Notes:

Finally, add in any notes about each scene. This might include a description of what’s happening, camera angles or movement, and any special effects. Don’t forget about audio like music or sound effects. Fill in all of the spaces provided on the storyboard template. You will likely run out of room when storyboarding some shots. In this case, flip the storyboard over and continue writing on the back, or use a separate sheet of paper, just be sure to label your notes with the corresponding shot number so that you don’t forget which shot you are working on.


A Few Last Storyboarding Tips:

Finally, don’t be too cautious about your storyboards. Take some chances. Draw quickly and sloppily if you feel inspired and need to get your ideas down on paper. You can go back and work on your storyboards. Have fun with your storyboards, they’re the perfect tool for letting your imagination work.

Here are a few more storyboarding tips:

  • Use rectangles that are the same aspect ratio as video, 16:9.
  • Number each rectangle for easy reference in discussions.
  • Bone up on the standard shot types used in video before you start.
  • Think in 3D. Make subjects/objects in the background smaller, so they appear farther away.
  • Cut up and recombine your storyboards to play with sequencing and narrative.
  • Use the finished storyboard to create a master shot list. This way nothing will get overlooked during production.

Keep the storyboard simple so it can be understood by anyone who views it, and be sure to share the finished product with everyone involved!


To download a fully editable version of the storyboard follow these steps:

  1.  Click on the link on the blog page and  download the storyboard by clicking the three dots next to share (opening the download gives you a limited version of Word).
  2.  Click File and then save as a Google document (this creates an editable storyboard).
  3. When you are ready to turn in the completed storyboard, click File, then download, then choose PDF. A PDF version should then be on your computer in your files
  4. Finally drag into OneDrive and share the link by embedding it into your blog post.

Example of a well-detailed story board:

https://eriesd-my.sharepoint.com/:b:/g/personal/dlafata_eriesd_org/ESInSI49C-tEqD1MJsmE_T4B7dwyfsmRKA5BFoqiX-pEng?e=wQ9Jpf

Now you are ready to create a storyboard for next video assignment! Please move on to the next post.